Saturday, April 27, 2013

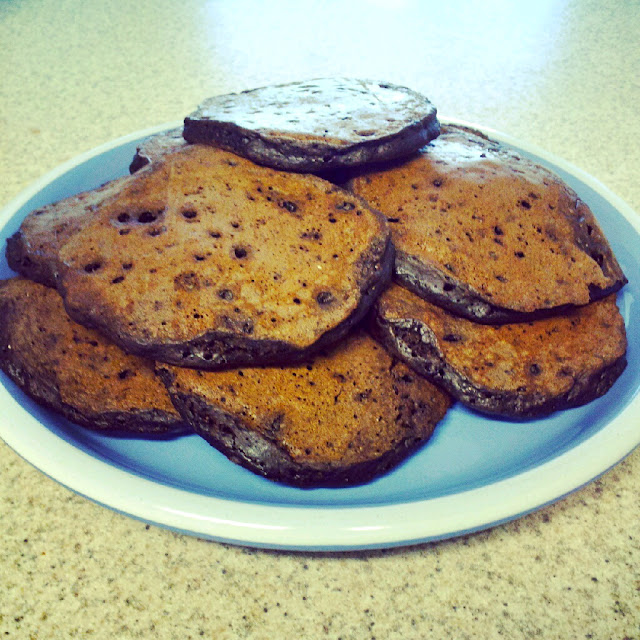
Chocolate Pancakes

Today is the first Saturday of my post-undergrad career, made all the better by beautiful sunshine, Tegan and Sara blasting in the kitchen, and these very chocolatey pancakes. I thought that walking out of my last exam yesterday would bring the crashing reality that was I officially finished with my undergrad career and that graduation was only two weeks away, but it was in fact making these pancakes at noon (yes, I eat pancakes for lunch sometimes...) that brought that reality to me. I realized that, for now until my graduate courses start, this was an actual, real-deal lazy Saturday afternoon. I don't have paper deadlines to worry about. I don't have to prepare any presentations. I don't have read three chapters by Monday morning. I am simply free to make pancakes and eat them while contemplating important things such as when Netflix will finally upload Season 3 of the Walking Dead. These are important questions to ask, after all.


I was particularly craving chocolate pancakes, and I was blown away by how good the chocolate flavor in this recipe. I tweaked the recipe a bit from the one found on the blog Go Bold With Butter by adding more whole wheat flour and a couple pinches of nutmeg, but I didn't touch the amount of chocolate because that was the most important part. Use the darkest cocoa powder you can find, such as Hershey's Special Dark cocoa powder! The darker the chocolate, the richer and better the chocolate flavor in your baked goods. When these are done cooking, slather them in butter and Grade-B maple syrup (slightly thicker and darker than Grade-A), and devour them. 

Today will definitely be a Saturday well-spent. Happy eating! 


 Chocolate Pancakes
3/4 cup all-purpose flour
1/2 cup whole wheat flour
1 1/2 teaspoons baking powder
1/2 teaspoon baking soda
1/3 cup unsweetened cocoa powder
3 tablespoons sugar
1/4 teaspoon ground nutmeg

1/4 teaspoon salt
1 egg
1 1 /4 cups milk
2 tablespoons melted butter
1 teaspoon vanilla


Combine the flours, baking powder, baking soda, cocoa powder, sugar, nutmeg, and salt in a medium bowl. In another bowl, combine the egg, milk, butter, and vanilla. Add the wet ingredients to the dry ingredients and mix to combine (a few lumps are fine). Heat a non-stick skillet or griddle to medium-high heat and spray with cooking spray. Ladle 1/4 cup amounts of batter onto the griddle and cook until bubbles form on top and the edges appear dry, then flip and cook for another 20-30 seconds. Cook all of the pancakes and serve with butter and Grade-B maple syrup. 

If you want to keep your pancakes warm while cooking the rest, heat the oven to 180-200 degrees and keep the pancakes there until all of them are cooked. 


Saturday, February 9, 2013

Homemade Dairy-Free Hot Chocolate

February is definitely hot chocolate weather, and although I am fine with using store-bought hot chocolate mixes, I am much more satisfied when I make it myself. It only takes a few extra minutes, but the results are so much creamier and flavorful! Plus, I can rest easy that there are no creepy additives that some store-bought brands carry. 

Now, I titled this post as "dairy-free" hot chocolate because I have almost completely switched to drinking almond milk instead of regular cows milk, unless I am making macaroni and cheese or other savory dishes. I am particularly fond of unsweetened vanilla almond milk or plain unsweetened almond milk - both are delicious. However, this recipe works just as well with cows milk, soy milk, coconut milk, etc.! So have no fear if the idea of drinking non-dairy milk is off-putting. Get creative and experiment with what you prefer!

Another ingredient that may come as a surprise is cornstarch. Ever wonder how some joints serve the most velvety hot chocolate? Cornstarch is an excellent way to achieve that consistency! Just a small amount does the trick, and it really does create a more unctuous texture than plain old store-bought mix. Unless I am in a pinch, I can't see myself buying cocoa mix from the store anytime soon. So here's to staying inside on cold, windy nights and sipping steaming mugs of homemade hot chocolate. Happy eating!


Dairy-Free Hot Chocolate
Serves 1

1 1/2 cups unsweetened almond milk (or other preferred milk)
2 tbs. sugar
1 heaping tbs. cocoa powder
1/2 tsp. cornstarch
pinch of salt

Heat the almond milk in a small sauce pan or in a microwave-safe measuring cup until very hot, or until your desired drinking temperature (mine took about 2.5 minutes in the microwave). In a large mug, combine the sugar, cocoa powder, cornstarch, and pinch of salt. Stir in a few tablespoons of the hot milk to form a thick paste. Add half of the remaining milk, stir thoroughly, then add the rest of the milk and stir until combined. Serve warm! 

For a Mexican Hot Chocolate variation, stir 1/4 teaspoon cinnamon and a dash of Ancho chili powder into the dry ingredients before adding the milk. Also try a Peppermint Hot Chocolate by adding 1/8 teaspoon (a couple drops) of peppermint extract to the milk before stirring into the dry ingredients. 

Sunday, February 3, 2013

Wagamama's Chicken Ramen

London is without a doubt one of my dream destinations, and the city is overflowing with ethnic food options from every continent. Even though I have never had the chance to eat there, Wagamama restaurant is so fascinating to me, and I have been wanting to make their famous chicken ramen for ages. Wagamama is a Japanese fusion restaurant that serves heaping bowls of noodles, rice, ramen, gyoza, katsu, and tons of other Japanese dishes in minutes flat. You walk in, sit down, the waiters take your order electronically at the table, and the food is brought to you super fast. I received the restaurant's cookbook a few Christmases ago, and the recipes are fast, relatively cheap, and SO GOOD. 

Their chicken ramen apparently is the stuff of regular Wagamama patrons' dreams, and I set out to make it for lunch today. I'm on a tight budget, so making their chicken stock 1 recipe, which includes a whole chicken and tons of vegetables, was kind of out of my price range. So I improvised their chicken stock 3 recipe and used store-bought organic chicken stock, fresh ginger, leek, and carrot and boiled it all until the flavors infused. The ramen noodles were also tricky for me, and I ended up having to buy Ramen brand's chicken ramen soup packs and discard the seasoning packets (although I really, really like the seasoning packet). Everything else, the green vegetables and broiled chicken, came together fairly quickly, and I was chowin' down on chicken ramen in no time. 

The soup needed a bit more salt than I expected, but once I added a few pinches of sea salt to the bowl, all of the flavors jumped out and I did not take a break from the bowl until the last drops of soup were gone. I also added cilantro because I adore it and it brightened the soup a bit. So go on and check out the Wagamama cookbook if you're broke like me and can't afford a ticket to London town anytime soon. Happy eating!


Wagamama's Chicken Ramen (makes 2 large bowls of soup)
adapted from the Wagamama Cookbook

For chicken stock:
5 cups store-bought or homemade chicken stock 
1 thumb-sized piece fresh ginger, roughly chopped
1 carrot, roughly chopped
1 leek, washed and roughly chopped (remove large green top, slice in half vertically, and rinse out the grit thoroughly before chopping)

Assemble soup:
2 small boneless, skinless chicken breasts

salt and white pepper

1 package Ramen noodles, seasoning packet removed
1 baby bok choy, roughly chopped (separate leaves, rinse well, and remove the tough white part at the bottom before chopping)
2 scallions, thinly sliced
small handful fresh cilantro (optional), roughly chopped
12 pieces bamboo shoots, found in the international foods aisle 

Combine the chicken stock in a pot with the ginger, carrot, and leek. Bring to a boil, lower heat and simmer for 5 minutes until the flavors come together. Strain the stock through a fine-mesh sieve, discard vegetables. Return the stock to the heat and keep over low heat until ready to serve. 

Preheat the broiler. Rub chicken breasts with a little oil, season with salt and white pepper. Broil until fully cooked, flipping if necessary. Let sit for about 5 minutes before slicing so the juices don't escape. While chicken is cooking, bring 2 cups of water to a boil, add the ramen noodles, and cook for 2-3 minutes until tender. Drain the noodles and rinse with cold water. Divide the noodles between two large bowls. Top the noodles with the bok choy, ladle the stock overtop, then top with the sliced chicken, scallions, cilantro, and bamboo shoots. Serve very hot with chop sticks and a large spoon. 

Thursday, January 31, 2013

Broiled Teriyaki Salmon (with Buttery Drop Biscuits & Garlic Green Beans)

I am a self-proclaimed cookbook fanatic. If I had more money in the bank, I would probably spend a good chunk of it on cookbooks of all kinds. Old ones, new ones, some overly specific ones (1,001 Cupcake Recipes!), and eventually a few that are written by celebrities. It takes a lot of coaxing for me to get into the mood to read and then buy a cookbook presented by a famous actor or musician, mostly because I feel like there is an ever-present expectation for celebrities to keep doing more. I don't doubt that many celebrities are fantastic cooks, but it feels odd to expect to find decent recipes in their books when they are presented next to an accomplished chef's culinary memoir. 

However, I am willing to put aside one celebrity in particular, whose cooking chops really do seem to exist, and fully embrace the fact that her cookbook is fantastic. I'm talking about Gwyneth Paltrow, a lovely actress and apparently a pretty hardcore foodie. She runs a foodie website called Goop and has gone on various food tours with Mario Batali and other famous chefs. I bought her cookbook My Father's Daughter last year because the recipes are simple enough, and the stories behind each dish really seem honest and meaningful to her. Basically, I feel like I could translate the dishes to my life and make them meaningful in my own way, which is what cooking is all about, really. 

So tonight I chose to make her recipe for teriyaki salmon and paired it with some hot, buttery drop biscuits and garlicky green beans. The biscuits are dead simple and worth baking a little beforehand, especially if you want something to snack on while the fish broils. I made sure to marinate the salmon for several hours while I was in class, and it definitely made a difference flavor-wise. Lastly, all I did for the green beans was thaw a few handfuls of the frozen kind, then sauté them in olive oil, garlic, red pepper flakes, and salt. Easy. 

I am already a huge fan of Gwyneth's other recipes in My Father's Daughter, and the salmon is definitely one of them. Hers is certainly a celebrity cookbook I can get behind. Ted Nugent's Kill It & Grill It or Coolio's aptly named Cookin' with Coolio, not so much. Happy eating! 


Gwyneth Paltrow's Teriyaki Salmon
This is a halved recipe, so feel free to double it!

2 tbs. soy sauce
1 tbs. rice wine vinegar or mirin
2 tbs. honey
1 tsp. peeled & grated fresh ginger
2 tbs. water 
2 sprigs fresh cilantro
2 (4 oz.) salmon filets 


Combine all of the ingredients except for the salmon in a small saucepan. Bring the marinade to a boil, then boil for 2 minutes. Let the marinade cool down completely before pouring over the salmon in a plastic container. Let the salmon marinate in the fridge for at least an hour or up to overnight. When ready to cook the fish, preheat the broiler. Place the salmon and marinade in a baking dish and broil until cooked through, about 5 minutes. Serve hot. 

Buttery Drop Biscuits

2 cups flour
2 1/2 tsp. baking powder
1/2 tsp. salt
1 tbs. sugar
4 tbs. cold butter, diced
1 1/4 cups milk

Preheat oven to 450 degrees. Combine the dry ingredients in a mixing bowl. Work the cold butter into the dry ingredients until the mixture resembles coarse cornmeal. Add half the milk and mix until combined. Add the remaining milk and stir until smooth. Drop dollops of dough onto a baking sheet, then bake for 12-15 minutes or until light brown. Brush with melted butter! 

Monday, January 14, 2013

Chipotle Potato & Black Bean Stew

Something about gloomy, rainy nights makes me crave spicy foods. Meals that make your lips burn and flavors that trick you into thinking you are somewhere else while the rain pours outside. Which is why I immediately flipped to one of my favorite cookbooks Vegan with a Vengeance by Isa Chandra for some inspiration and adapted one of her recipes for this hearty stew. I say "adapted" because the recipe was supposed to have sweet corn in it, but unfortunately I forgot to put it on my grocery list and it never got into the stew. It's a shame because corn in this recipe would add just the sweetness it needs to balance the smoky spiciness of the chipotles and the starch of the beans and potatoes. 

My favorite part about the stew is the chipotle peppers, which are smoked jalapeños stored in a vinegary sauce called adobo, and man are they spicy. I don't even want to know what it would be like working in the factory that makes these fiery peppers. Just two peppers from the can is plenty to add smoke and heat to the veggies, unless you are a spice fanatic and like to feel the burn. In which case, add as many or as few chipotles as you'd like. Don't say I didn't warn you, though. 

Even without the corn, this was absolutely delicious and it made a TON of food. I mean, three containers worth of food. I will be eating for days! I served it with cornbread from a box mix to which I added shredded smoked gouda cheese before baking - yummmm. This is originally a vegan recipe, so leaving out the shredded cheese on top would keep it that way, but I eat cheese almost every day, so it was a no-brainer that I would add it. 

Tonight, I enjoyed eating this stew and chatting with my roommate as the rain poured outside and our new Beta fish Tibault swam lazily in his fish bowl. Sometimes staying in, relaxing, and being at peace in the company of others is all you need to make an evening wonderful. Happy eating! 


Chipotle Potato & Black Bean Stew

2 tbs. olive oil 
1 small yellow onion, peeled and thinly sliced
3 cloves garlic
course salt & black pepper
2 tsp. cumin
1/2 tsp. dried oregano
2 chipotle peppers in adobo*, chopped 
1 (28 oz.) can crushed tomatoes
3 cups water 
3 Russet potatoes, washed and cut into 1/2-inch dice
8 baby carrots (or 2 medium carrots), diced
1 (16 oz.) can black beans, drained and rinsed
2 tsp. honey
zest of 1 lime
juice of 1 lime
shredded cheese for serving, optional (smoked gouda, cheddar, pepper jack, etc.)

Heat the olive oil in a large pot over medium-high heat, add the onion and garlic. Season with salt and pepper, saute for 5 minutes. Add the cumin and dried oregano and cook for 1 minute more. Stir in the chipotle peppers, tomatoes, and water and stir. Add the potatoes and carrots and bring to a low boil, cooking until tender. Add a little more water if the stew gets too dry before the potatoes cook. Add the black beans, honey, lime zest, and lime juice, and season with salt to taste. 

Take the stew off the heat and cover the pot with the lid. Let sit for at least 10 minutes before serving. Serve with shredded cheddar cheese and cornbread. 

*Tip for storing leftover chipotle peppers: Place the remaining chipotle peppers with their juice in a freezer-safe plastic zip baggie, and place the bag in the freezer. When you need the chipotles for another recipe, simply peel back the plastic and grate the chipotles on a cheese grater. This works every time for me and the chipotle flavor is still fresh.  

Sunday, January 13, 2013

Sweet Potato & Chorizo Hash

Growing up, I was never a lover of fried eggs. I was often repulsed by the sight of a runny yolk, especially if someone else ordered them at a diner, allowing the yellow contents to flow and touch everything on their plate. I remember thinking something along the lines of, "Oh my gosh! HOW can you let that stuff touch your perfectly good bacon? Your hash browns? Oh no, not the toast, too!" I was always more comfortable with enjoying scrambled eggs, and I should probably owe this to the fact that I was never really taught to eat fried eggs and to truly enjoy the sunshine yellow yolk in its intact form. 

Then I studied in Seville, Spain for four months during my junior year of college, and my whole egg-eating experience was rocked by my host mother's cooking. I can still remember her laying a beautiful multicolored bowl of Spanish pisto manchego (a gorgeous vegetable stew) in front of me and boldly declaring that this would be the best pisto I would hope to try. It looked and smelled incredible, but alas... atop my stew was a perfectly round over-easy egg, the yolk already broken and pouring over my meal. I looked at my roommate, who was already digging into her dinner. I tapped her on the shoulder and whispered, "I don't know if I can do this. There is egg yolk all over my food!" Corinne, bless her heart, nudged me and told me it was delicious and that I would love it. So I took a deep breath, crying a little inside because I still held the memories of diner food covered in yellow, and took a huge bite. I figured, go big or go home. 

That pisto combined with the rich egg yolk completely eradicated my egg phobia. I can honestly say that a switch flipped inside my brain from ewwwwwgrosseggyolksbleeeehhh to moremoremoremoremoremoreeggyolksplease. I am in love with egg yolks now and forever. We ate them countless times in Spain, and I prepare them several times a week at home. As such, they are perfect set atop my sweet potato and chorizo hash. The spices and meatiness from the chorizo make the sweet potatoes sing, and the egg on top creates a sort of rich sauce that I like to soak up with buttered toast. 

I like to think that without the help of my host mother Barbara and her incredible cooking, this hash would not have happened. Happy eating! 


Sweet Potato & Chorizo Hash
Makes 2 large portions

1 medium sweet potato, washed and cut into 1-inch chunks
1 chicken chorizo sausage (found in the refrigerated section of the grocery store), cut into small chunks
2 tablespoons olive oil
1/4 teaspoon cinnamon
1/4 teaspoon cumin
1/2 teaspoon chili powder
1/2 teaspoon dried oregano
heavy pinch of course salt 
lots of cracked black pepper

Preheat oven to 350 degrees. Combine all of the ingredients and place on a rimmed cookie sheet. Bake for 25-30 minutes, until the sweet potatoes are cooked through and browned, and the chorizo is crispy. Serve hot with a fried egg and buttered toast.